关于Chrome跨域The request client is not a secure context and the resource is in more-private address space loca相关提示的解决
Espruino单片机上的javascript
nodejs开发的神器 now
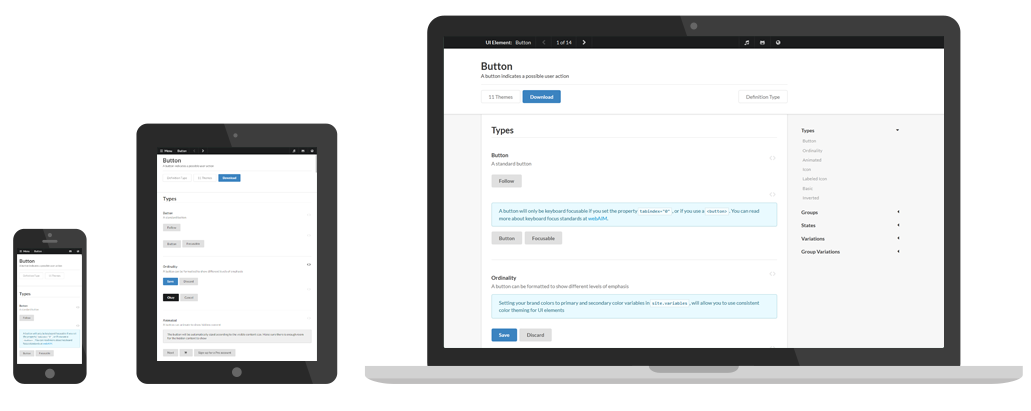
前端框架Semantic-ui
官网: http://www.semantic-ui.cn/
更快地设计赏心悦目的网站
Semantic作为一款开发框架,帮助开发者使用对人类友好的HTML语言构建优雅的响应式布局。
简洁的 HTML
Semantic UI中词语和类(css clases)是可以相互替换的概念
直观的使用自然语言中的语法,词汇和语序等来定义一个类(css class)。
取BEM 和 SMACSS 的精华,同时使之更易于使用。
直观明了的 Javascript
Semantic 使用被叫做 behaviors 的简单短语来触发功能
开发者可以更改任何组件中的配置来设置该组件中的某一设置
化繁为简的调试
记录日志使您很方便的追踪到性能瓶颈,而不必去堆栈轨迹中发掘问题所在。
写了个jquery的自动填充form插件
写了一个ThinkPHP的模板引擎, 仿angular的, 简单版
前段时间学习angularjs, 里面的模板思想和实现方法很酷, 就心血来潮, 想实现一个php版的, 今天试着写了一下, 发现貌似可以, 具体看源码.
./ThinkPHP/Library/Think/Template/Driver/Angular.class.php
<?phpnamespace Think\Template\Driver;use Think\Storage;/*** Angular模板引擎驱动*/class Angular {private $config = array();private $tpl_var = array();/*** 架构函数*/public function __construct() {$this->config['cache_path'] = C('CACHE_PATH');$this->config['tpl_dir'] = THEME_PATH;$this->config['cache_path'] = C('CACHE_PATH');$this->config['template_suffix'] = C('TMPL_TEMPLATE_SUFFIX');$this->config['cache_suffix'] = C('TMPL_CACHFILE_SUFFIX');$this->config['tmpl_cache'] = C('TMPL_CACHE_ON');$this->config['cache_time'] = C('TMPL_CACHE_TIME');$this->config['attr'] = 'tp-';}/*** 编译模板* @param type $tpl_file 模板文件* @param type $tpl_var 模板变量*/public function fetch($tpl_file, $tpl_var) {$this->tpl_var = $tpl_var;$tpl_file = $this->load_template($tpl_file);Storage::load($tpl_file, $tpl_var, null, 'tpl');}/*** 加载主模板并缓存* @param string $tpl_file 模板文件名* @return string 缓存的模板文件名*/public function load_template($tpl_file) {if (is_file($tpl_file)) {// 读取模板文件内容$tpl_content = file_get_contents($tpl_file);} else {$tpl_content = $tpl_file;}// 根据模版文件名定位缓存文件$tpl_cache_file = $this->config['cache_path'] . md5($tpl_file) . $this->config['cache_suffix'];if (Storage::has($tpl_cache_file) && !APP_DEBUG && $this->config['tmpl_cache']) {return $tpl_cache_file;}// 编译模板内容$tpl_content = $this->compiler($tpl_content);Storage::put($tpl_cache_file, trim($tpl_content), 'tpl');return $tpl_cache_file;}/*** 编译模板内容* @param string $tpl_content 模板内容* @return string 编译后端php混编代码*/protected function compiler($tpl_content) {//模板解析$tpl_content = $this->parse($tpl_content);// 添加安全代码$tpl_content = '<?php if (!defined(\'THINK_PATH\')) exit();?>' . $tpl_content;// 优化生成的php代码$tpl_content = str_replace('?><?php', '', $tpl_content);return strip_whitespace($tpl_content);}/*** 解析模板标签属性* @param string $content 要模板代码* @return string 解析后的模板代码*/public function parse($content) {while (true) {$sub = $this->match($content);if ($sub) {$method = 'parse_' . $sub['attr'];if (method_exists($this, $method)) {$content = $this->$method($content, $sub);} else {E("模板属性" . $this->config['attr'] . $sub['attr'] . '没有对应的解析规则');break;}} else {break;}}$content = $this->parse_value($content);return $content;}/*** 解析include属性* @param string $content 源模板内容* @param array $match 一个正则匹配结果集, 包含 html, value, attr* @return string 解析后的模板内容*/private function parse_include($content, $match) {$tpl_name = $match['value'];if (substr($tpl_name, 0, 1) == '$') {//支持加载变量文件名$tpl_name = $this->get(substr($tpl_name, 1));}$array = explode(',', $tpl_name);$parse_str = '';foreach ($array as $tpl) {if (empty($tpl))continue;if (false === strpos($tpl, $this->config['template_suffix'])) {// 解析规则为 模块@主题/控制器/操作$tpl = T($tpl);}// 获取模板文件内容$parse_str .= file_get_contents($tpl);}return str_replace($match['html'], $parse_str, $content);}/*** 解析if属性* @param string $content 源模板内容* @param array $match 一个正则匹配结果集, 包含 html, value, attr* @return string 解析后的模板内容*/private function parse_if($content, $match) {$new = "<?php if ({$match['value']}) { ?>";$new .= str_replace($match['exp'], '', $match['html']);$new .= '<?php } ?>';return str_replace($match['html'], $new, $content);}/*** 解析repeat属性* @param string $content 源模板内容* @param array $match 一个正则匹配结果集, 包含 html, value, attr* @return string 解析后的模板内容*/private function parse_repeat($content, $match) {$new = "<?php foreach ({$match['value']}) { ?>";$new .= str_replace($match['exp'], '', $match['html']);$new .= '<?php } ?>';return str_replace($match['html'], $new, $content);}/*** 解析show属性* @param string $content 源模板内容* @param array $match 一个正则匹配结果集, 包含 html, value, attr* @return string 解析后的模板内容*/private function parse_show($content, $match) {$new = "<?php if ({$match['value']}) { ?>";$new .= str_replace($match['exp'], '', $match['html']);$new .= '<?php } ?>';return str_replace($match['html'], $new, $content);}/*** 解析hide属性* @param string $content 源模板内容* @param array $match 一个正则匹配结果集, 包含 html, value, attr* @return string 解析后的模板内容*/private function parse_hide($content, $match) {$new = "<?php if (!({$match['value']})) { ?>";$new .= str_replace($match['exp'], '', $match['html']);$new .= '<?php } ?>';return str_replace($match['html'], $new, $content);}/*** 解析普通变量和函数{$title}{:function_name}* @param string $content 源模板内容* @return string 解析后的模板内容*/private function parse_value($content) {$content = preg_replace('/\{(\$.*?)\}/', '<?php echo \1 ?>', $content);$content = preg_replace('/\{\:(.*?)\}/', '<?php echo \1 ?>', $content);return $content;}/*** 获取第一个表达式* @param string $content 要解析的模板内容* @return array 一个匹配的标签数组*/private function match($content) {$reg = '#<(?<tag>[\w]+)[^>]*?\s(?<exp>' . preg_quote($this->config['attr']) . '(?<attr>[\w]+)=([\'"])(?<value>[^\4]*?)\4)[^>]*>#s';$match = null;if (!preg_match($reg, $content, $match)) {return null;}$sub = $match[0];$tag = $match['tag'];/* 如果是但标签, 就直接返回 */if (substr($sub, -2) == '/>') {$match['html'] = $match[0];return $match;}/* 查找完整标签 */$start_tag_len = strlen($tag) + 1; // <div$end_tag_len = strlen($tag) + 3; // </div>$start_tag_count = 0;$content_len = strlen($content);$pos = strpos($content, $sub);$start_pos = $pos + strlen($sub);while ($start_pos < $content_len) {$is_start_tag = substr($content, $start_pos, $start_tag_len) == '<' . $tag;$is_end_tag = substr($content, $start_pos, $end_tag_len) == "</$tag>";if ($is_start_tag) {$start_tag_count++;}if ($is_end_tag) {$start_tag_count--;}if ($start_tag_count < 0) {$match['html'] = substr($content, $pos, $start_pos - $pos + $end_tag_len);return $match;}$start_pos++;}return null;}}
./Application/Home/Controller/TestController.class.php
<?phpnamespace Home\Controller;use Think\Controller;class TestController extends Controller {public function index() {C('SHOW_PAGE_TRACE', true);C('TMPL_ENGINE_TYPE', 'Angular');$data = array();$data['title'] = '标题';$data['nav'] = array(array('title' => '首页', 'url' => '/'),array('title' => '文章', 'url' => '/article'),array('title' => '图片', 'url' => '/pic'),array('title' => '新闻', 'url' => '/news'),);$data['count'] = 6;$data['list'] = array(array('id' => 1, 'title' => '这是标题1', 'create_time' => strtotime('-5 seconds')),array('id' => 2, 'title' => '这是标题2', 'create_time' => strtotime('-4 seconds')),array('id' => 3, 'title' => '这是标题3', 'create_time' => strtotime('-3 seconds')),array('id' => 4, 'title' => '这是标题4', 'create_time' => strtotime('-2 seconds')),array('id' => 5, 'title' => '这是标题5', 'create_time' => strtotime('-1 seconds')),array('id' => 6, 'title' => '这是标题6', 'create_time' => NOW_TIME),);$this->assign($data);$this->display('index');}}
./Application/Home/View/Test/index.html
<!DOCTYPE html><html><head><title>Angular 模板测试 - {$title}</title><meta charset="UTF-8"><meta name="viewport" content="width=device-width, initial-scale=1.0"><style>* {margin: 0px;padding: 0px;font-size: 12px;color: #333;line-height: 20px;}a {color: #33F;text-decoration: none;}a:hover {color: #f00;text-decoration: underline;}.center {text-align: center;}h1{font-size: 30px;line-height: 50px;}.nav {line-height: 30px;}.nav a{padding: 0px;margin: 0px 20px;}.main table{width: 500px;margin: 0px auto;}table {border: 1px solid #666;}table td,table th{border: 1px solid #666;line-height: 20px;padding: 0px 5px;}table th{background: #CCC;}#footer p{text-align: center;line-height: 30px;}</style></head><body><div class="header"><h1 class="center">Angular 模板测试 - {$title}</h1><div class="nav center" tp-if="$nav"><a tp-repeat="$nav as $vo" href="{$vo['url']}">{$vo['title']}</a></div></div><div class="main"><table><tr><th>编号</th><th>标题</th><th>创建时间</th><th>操作</th></tr><tr tp-if="$list" tp-repeat="$list as $vo"><td>{$vo['id']}</td><td>{$vo['title']}</td><td>{:date('Y-m-d H:i:s', $vo['create_time'])}</td><td><a href="#del={$vo['id']}">删除</a></td></tr><tr tp-if="$count"><td colspan="4" class="center">共 {$count} 条数据</td></tr><tr tp-hide="$list"><td colspan="4" class="center">没有数据</td></tr></table></div><div tp-include="footer"></div></body></html>
./Application/Home/View/Test/footer.html
<footer id="footer"><div class="foot-warp"><p>© 2015 {:C('SITE_TITLE')} zhaishuaigan@qq.com 豫ICP备13012601号</p></div></footer>
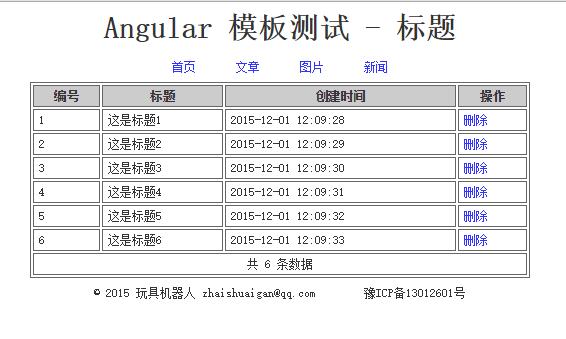
运行/Test/index, 显示结果
目前只是实现了简单的解析, 还需要进一步完善, 比如配置啊, 扩展更多的标签啊什么的.